Follow this blog

Software engineering, design, and psychology

Later Ctrl + ↑

Decomposition of ESBs into Cloud Services | Microservice Architecture — Ep. 8

Let’s revise what were the responsibilities of Enterprise Service Buses:

  • service discovery and communication
  • request routing
  • protocol mediation
  • authN and authZ
  • rate limiting
  • logging and monitoring
  • workflow orchestration

These capabilities are generic. Any sufficiently complex system needs them — but they don’t need to live inside a single, centralized component.

In cloud-native systems, ESBs were effectively decomposed into specialized services:

  • service discovery -> service mesh tools (AppMesh, Linkerd)
  • service communication -> messaging and event streaming platforms (Kafka, SQS)
  • request routing, rate limiting, auth -> API gateways
  • logging and monitoring -> observability tools (CloudWatch, CloudTrail)
  • orchestration -> workflow engines (Step Functions)

What remained were microservices themselves:

  • independently developed
  • independently deployed
  • independently scaled
    ...units of a system, focused on isolated business capabilities.

Tech Background of the Early 2010s | Microservice Architecture — Ep. 7

The late 2000s to early 2010s marked the emergence of cloud computing. AWS and Google Cloud made on-demand compute available at scale.

The hardware and infrastructure assumptions shifted:

  • ephemeral instances became the norm
  • horizontal scaling became cheaper
  • infrastructure-as-code tools appeared and matured
  • instance and network failures now considered expected, not exceptional

At the same time, communication protocols and platforms stabilized around clear leaders:

  • HTTP as the universal transport
  • JSON as the universal data language
  • REST / gRPC as dominant API styles
  • Linux as the default server OS

This convergence reduced the need for protocol mediation and heavy integration layers — some of the reasons ESBs were invented. The switch from SOA was not driven only by its limitations, but also by changes in technology.

Drawbacks of Enterprise Service Buses | Microservice Architecture — Ep. 6

ESBs gathered all control over the system in a single place: communication, schemas, orchestration, infrastructure. Over time, this revealed systemic issues:

  • The ESB became a single point of failure: a bug could bring down entire system.
  • ESB changes were risky and slow: engineers had to deeply understand schemas, adapters, business rules, and their interdependencies.
  • Updates to services became problematic: even a small change in API required coordination with the ESB integration layer and orchestration logic.
  • The ESB team turned into a bottleneck, struggling to catch up with changes in different services.
  • Horizontal scaling was limited: ESBs commonly relied on vertical scaling and expensive hardware.

These issues slowed innovation and adaptability, turning large systems rigid, slow, and outdated. Another kind of architectural approach had to appear — one favoring independent ownership, decentralized control, and horizontal scaling of any service.

Peak of SOA — Enterprise Service Bus | Microservice Architecture — Ep. 5

The core of service-oriented architecture is centralized governance over how diverse services provide their capabilities and communicate.

This idea lead to the Enterprise Service Bus (ESB) — a central integration layer connecting all services, handling:

  • protocol conversion
  • message translation into enterprise-wide data models
  • request routing
  • security rules for all services (auth, rate limiting, access control)
  • centralized logging and auditing
  • workflow orchestration, including cross-service transactions and compensations

ESB made sense in heterogeneous enterprise environments — but it also concentrated complexity and control in one place. Many of today’s architectural advancements are reactions to this tradeoff.

Service-Oriented Architecture (SOA) | Microservice Architecture — Ep. 4

SOA is a predecessor to microservices. It is an architectural style that treats services as independent, heterogeneous providers of business capabilities.

“Heterogeneity” here acknowledges that services may:

  • belong to different vendors
  • run on different platforms
  • be written in different languages
  • communicate over different protocols
  • be developed by different teams

SOA emphasizes:

  • well-defined, explicit service interfaces
  • stability and genericity of contracts to serve multiple consumers over long periods of time
  • service discovery via service registries
  • centralized service administration with approval of contracts, schemas, and compatibility guarantees

The focus on central governance and long-lived, broadly reusable contracts is the key distinction between SOA and modern microservices. It is also its key limitation factor: services cannot evolve quickly because of dependence on central governance and strictness of agreed-upon interfaces.

Microservices vs. Traditional Services | Microservice Architecture — Ep. 3

A microservice is not a “small service” — it is a service with stricter constraints.

A microservice:

  • owns a single business capability (“bounded context‘ in DDD terms)
  • has limited to no dependencies on other microservices
  • is deployed and versioned independently, without coordination with its consumers
  • evolves its API in a backward-compatible way, giving consumers time to upgrade
  • is owned by a team small enough to understand and operate it end-to-end (the ‘two-pizza team‘)

What the ‘micro-’ prefix does not mean:

  • trivial logic
  • a small codebase
  • few endpoints

A microservice can be large and complex, as long as it remains cohesive and operable by a small team. And it can be small and simple too — if that’s what its business capability or scaling needs require.

Services vs. Components | Microservice Architecture — Ep. 2

What is the difference between a service and a component? Both should be cohesive and loosely coupled to the rest of application, both should solve a single problem, both have no hard limits on size. The key difference is the boundary.

Comparing to a component, a service:

  • does not share memory with other processes
  • is not accessed directly — only via a network
  • fails independently, without crashing the entire application
  • scales independently from the main process or other services

Components are in-process abstractions.
Services are distributed system units.

What is a Service? | Microservice Architecture — Ep. 1

This is the beginning of series on Microservices & Event-Driven Architecture (MEDA). The series explores the theme from its historical context to practical topics like testing, deployment, and observability.

All research and writing are done by me. The ideas are drawn from respected books and lectures, as well as my own professional experience. No AI is used to generate the content itself; I use ChatGPT only for editing, as English is not my native language, and I believe the texts benefit from AI corrections of my grammar and fluency.

I hope you find this series helpful and interesting. If you notice any errors or have suggestions, feel free to contact me at george@mishurovsky.com or leave a comment — I read them all.

Now, let’s proceed to the topic.

It helps to settle with fundamentals before diving into modern software architecture buzzwords like ‘microservices’ and ‘event-driven systems’.

A service is:

  • a self-contained unit of functionality
  • serving a specific business purpose
  • owning both its logic and data
  • deployed independently
  • providing capabilities through a standardized interface
  • accessed through a network boundary (real or assumed)

Note the emphases on autonomy and boundaries (functional and communicational). Without those, we’re talking about components, but not services.

Understanding this distinction makes architectural discussions clearer and prevents “microservices” from becoming just a fancy label for a distributed monolith.

📚 Bookshelf

Below is a list of books I’ve finished — and those I plan to read. I will update it from time to time, as I discover new titles. Welcome!

If you are a junior developer, consider some of the marked titles. As for senior engineers, I hope you’ll find here some interesting reads as well.

Also welcome to the comments for this post and in linked book reviews! What do you think? Which other books are worthy of attention?

Notes on marks:
⭐️ — Brilliant, must read
🧱 — Foundational, recommended for beginners in a particular technology or software engineering in general

Finished

General Software Engineering

  • Clean Architecture — R. C. Martin 🧱
  • Clean Code — R. C. Martin
  • Code Complete — S. McConnell 🧱
  • Design Patterns — E. Gamma 🧱
  • Domain Modeling Made Functional — S. Wlaschin
  • Domain-Driven Design — E. Evans ⭐️
  • Patterns of Enterprise Application Architecture — M. Fowler ⭐️
  • Professor Fisby’s Mostly Adequate Guide to Functional Programming — B. Lonsdorf 🧱
  • Refactoring — M. Fowler ⭐️
  • The Object Oriented Way — C. Okhravi 🧱 (Review)

Working with Data

  • Designing Data-Intensive Applications — M. Kleppmann ⭐️
  • Data Pipelines Pocket Reference — J. Densmore (Review)
  • Learning SQL — A. Beaulieu 🧱

DevOps & Cloud Computing

  • AWS Certified Solutions Architect Associate (SAA-C03) Cert Guide — M. Wilkins
  • Continuous Integration — P. M. Duvall 🧱

Design

  • Practical UI — A. Dannaway
  • Refactoring UI — A. Wathan
  • The Elements of Color — J. Itten ⭐️

Management & Leadership

  • Fundamentals of Project Management — J. Heagney
  • Getting Real — D. H. Hansson ⭐️
  • Start with No — J. Camp ⭐️

Particular Technologies

  • AI Engineering — C. Huyen 🧱
  • Effective TypeScript — D. Vanderkam
  • Node.js Design Patterns — M. Casciaro
  • Web Scraping with Python — Ryan Mitchell 🧱 (Review)

In-Progress

  • Continuous Delivery — D. Farley
  • Continuous Deployment — V. Servile
  • Introduction to Algorithms — T. Cormen
  • Purely Functional Data Structures — C. Okasaki
  • Stylish F# — K. Eason
  • Systems Engineering Principles and Practice — A. Kossiakoff
  • The Art of PostgreSQL — D. Fontaine

Waiting In the Shelf

  • Accelerate — N. Forsgren
  • Building Microservices — S. Newman
  • Distributed Services with Go — T. Jeffery
  • Grokking Simplicity — E. Normand
  • Philosophy of Software Design — J. Ousterhout
  • Serverless Development on AWS — S. Brisals
  • Software Architecture — N. Ford
  • Structure and Interpretation of Computer Programs — H. Abelson
  • Team Topologies — M. Skelton
  • The Linux Command Line — W. Shotts

Dijkstra’s Algorithm is Basically a BFS Algorithm

A small note on a commonly mentioned algorithm — trying not to sound too pretentious 😅

If you, like me, get startled every time you see Dijkstra’s algorithm, forgetting how it works exactly — it is essentially a breadth-first search (BFS), but with two twists:

  • The graph is weighted
  • The queue is min-priority, not FIFO

So instead of blindly processing nodes in a queue one by one, we always pick the node with the lowest cumulative distance.

Once you realize this, the algorigthm becomes quite simple to implement, and the most of the complexity moves into building an efficient min-priority queue based on a Fibonacci or pairing heap.

Strictly speaking, it is BFS that is a special case of Dijkstra’s algorithm for unweighted graphs, not the other way around.

How to Rename Entities Project-Wide in CLI with Find, Grep, Sed, and Rename

There are times in software projects when a big shift happens in domain representation. This results in changes of project structure, class responsibilities, and occasionally, requires bulk renames of entities across the whole codebase.

Imagine we need to rename every Employee to Worker. This change should affect both file paths and textual occurrences throughout the project.

Renaming may sound like a simple problem: assuming there are no external dependencies using the target name, we just need to rename all occurrences of it inside a repository. But there multiple caveats:

  1. We must rename both file names and folder names.
  2. We must rename all code and text occurrences.
  3. Casing must be preserved: Employee → Worker, and employee → worker.
  4. Both plain and compound usages must be properly renamed: createEmployee → createWorker.
  5. Non-code, non-document files must not be affected (consider binary files which by coincidence might have an ...employee... fragment inside).
  6. There are folders or files which we would want to omit from renaming (e. g., .git).
  7. No IDE provides such functionality, so we cannot rely on existing solutions.

I will address all these challenges in a solution below, but there is an important complexity that cannot be tackled with automation. If by any chance your code depends on a library with the target name (e. g., employee.js) or uses exports from a library containing the target name (import type { valuableEmployeee } from ‘employee-js’), you’ll have to resolve issues manually after renaming.

Reviewing Expected Changes

First, remove any folders and files that are recreated during project builds or setup: build/, dist/, node_modules/, .storybook-static/, etc. This step isn’t strictly necessary, but it can help iterate faster if commands encounter errors.

Now, let’s start with renaming text occurrences by listing all files that might get affected with find command. Here I am using -iname for case-insensitive search and `-not -path ‘’` syntax to exclude folders we need to protect from changes.

Shell
find . -not -path '*/.*' -not -path 'src/protected' -iname '*employee*'

Revise the output: make sure it does not contain folders or files you do not want to be changed.

Then, let’s see which text occurrences inside our files will be affected. Same approach: case-insensitive search in all files, excluding protected directories or files.

Shell
grep -RIn -i --exclude-dir='*/.*' --exclude-dir='src/protected' 'employee' .

In the output you’ll see all lines containing the target name. Revise all them carefully: if you want to protect some names from changes, you might want to add file names to exclusion, or rename such occurrences manually to some special value (e. g. em#plo#yee), so you can revert it later.

Renaming Text Occurences

Now we can rename all text occurrences, handling separately each casing. It will require some sed magic:

Shell
LC_CTYPE=UTF-8 find . -type f \
  -not -path '*/.*' \
  \( -name '*.ts' -o -name '*.tsx' -o -name '*.js' -o -name '*.json' \) \
  -exec sed -i 's/Employee/Worker/g; s/employee/worker/g' {} +

There are two important points here. First, LC_CTYPE=UTF-8 allows us to treat all file characters as UTF-8, even if the situation is different. Without it, sed stops when encounters non-UTF-8 characters. Second, we use -o -name ‘*.ext’ syntax to list file extensions to be affected. This prevents accidental changes of binary or image file contents.

Renaming Paths

Hopefully, file content renaming finished successfully. From here we will proceed with renaming of file and folder names. For this we will use rename command ingesting find output:

Shell
find . -not -path '*/.*' -depth -name '*Employee*' \
  -exec rename 's/Employee/Worker/g' {} +
find . -not -path '*/.*' -depth -name '*employee*' \
  -exec rename 's/employee/worker/g' {} +

These commands might produce warnings. If you have file paths that include multiple occurrences of the target name, the renames will be performed only for the first one, so you will have to run the commands multiple times until the paths are fully renamed.

And that’s it! ✨
If you created any specially-renamed entities, rename them back manually. Then run git add and git commit — git should detect all path renames automatically.

The Day of My First Open-Source Contribution

This Friday called for a small celebration! For the first time in my professional career, I opened a PR in a major open-source repository – and it was approved and merged! 🎉

Now, let’s be honest: it was the tiniest contribution possible. I fixed a single missing character in the docs for the List.sort function. You really can’t go smaller than that — unless someone figures out how to commit whitespace.

But it is still a moment to be proud of. It was my genuine finding when I was learning how to use F#, and creating a proper PR for such a big repository is a good exercise by its own!

Now I can officially call myself as .NET / F# contributor 😏

Book review: “The Object Oriented Way”, Christopher Okhravi

Last week I finished reading “The Object Oriented Way” by Christopher Okhravi. I was attracted to this book with occasional posts by the author on Youtube where he was discussing complex and interesting topics of OOP. His dives into use cases for composition vs. inheritance, composition patterns, and dependency inversion finally convinced me to buy a full copy. I was not disappointed!

This book is like a Bible of OOP. It starts from the very foundational topics like syntax, declaration vs. assignment vs. initialization, number types, variable mutability and so on – written in a concise yet exhaustive manner.

The story develops with detailed discussion of all the tools used in C# OOP, each chapter more advanced than the previous one. It culminates with very interesting discourse of Liskov Substitution Principle: covariance, contravariance, invariance, and the limitations C# has regarding pure logical object-oriented compatibility.

The ending was somewhat unexpected. For me it turned a textbook into a wonderfully written story, with a narration gradually building cognitive tension towards beautiful complexity and then resolution with a new state, a level above the starting point. I will not spoil any details, though :)

Whom this book is going to be useful:

  • anybody who wants to learn C#
  • junior devs to build a solid understanding of OOP toolchain
  • middle-to-senior devs to fill in the gaps in OOP theory
  • staff devs and above to master arguments for or against object-oriented approach in a particular module

Verdict: 4.5 / 5 – essential.
Consider buying the full book. It is a worthy investment for most of OOP practitioners.

I personally would love to see more detailed UML diagram section. They can be quite complex, and it would be cool to have a complete material on how to write expressive diagrams when planning OOP architecture.

A Security Checklist for Senior Engineers and Tech Leads

Couple of years ago, I told an interviewer I didn’t want to work on security problems because I found them boring. My mind has changed since then.

Security requirements are genuine engineering constraints. They drive development of sophisticated solutions, and it is interesting to work with them. The hard part, though, is knowing an exact list of critical security issues and approaches to them.

That’s why I asked ChatGPT for such list – on a level a solid principal engineer should know. The response was quite reasonable, so I spent some time refining the list, and here is the result! I keep it as a reference for myself, and I hope you’ll find it useful, too.

Core Web App Security

  • API Security: REST/GraphQL hardening, input validation, over/under-fetching prevention, API keys, HMAC, request signing, certificate pinning, replay prevention.
  • Authentication & Identity: password storage (bcrypt/argon2), MFA, OAuth2/OIDC, SAML, JWT best practices.
  • Authorization: RBAC, ABAC, least privilege, privilege escalation prevention.
  • CSRF Protection: tokens, SameSite cookies, double-submit cookie pattern.
  • Data Protection: encryption at rest (AES-256+), in transit (TLS 1.2+), key management.
  • Error Handling & Logging: no sensitive data leaks, structured logging, correlation IDs.
  • File Uploads: validation, MIME checks, virus scanning, sandboxing.
  • Injection Attacks: SQLi, NoSQLi, LDAP, OS command injection, template injection.
  • Input Validation: sanitization, strict schema validation, whitelisting.
  • Output Encoding: escaping for HTML, JS, CSS, URLs to prevent XSS.
  • Rate Limiting & DoS Protection: throttling, circuit breakers, caching.
  • Secrets Management: key rotation policies, vaults (e. g., HashiCorp Vault, AWS Secrets Manager).
  • Session Management: secure cookies, SameSite, HttpOnly, session fixation, token expiry/rotation.

Browser & Front-End Security

  • Clickjacking Protection: X-Frame-Options, frame-ancestors.
  • CSP (Content Security Policy): nonces, strict-dynamic, avoiding unsafe-inline.
  • HTTP caching headers: Cache-Control, Vary, Pragma for sensitive data.
  • Subresource Integrity (SRI) for 3rd-party scripts.
  • Trusted Types to mitigate DOM-based XSS.
  • Web Storage Security: storing sensitive data outside of localStorage or sessionStorage.

Infrastructure & Deployment

  • CI/CD Security: supply chain attacks, dependency scanning (SCA), signed builds.
  • Container Security: minimal images, runtime restrictions, scanning (Trivy, Clair).
  • DNS Security: DNSSEC, avoiding cache poisoning.
  • HTTPS Everywhere: HSTS, secure TLS configs, certificate rotation.
  • IaC Security: secure Terraform and CloudFormation, policy-as-code (OPA).
  • Reverse Proxies & WAFs: e. g., Cloudflare, AWS WAF.
  • Secret and Key Management: choosing correct algorithms (AES-GCM, RSA vs ECC, SHA-2/3), key rotation policies, HSMs/KMS use.
  • Secrets in CI/CD: no hardcoded creds, encrypted variables.

Operational & Organizational

  • Compliance & Privacy: GDPR, HIPAA, SOC2, PCI-DSS basics.
  • Dependency Management: SCA, patching, SBOMs.
  • External Attack Surface Discovery: domains, APIs, old endpoints.
  • Insider Threats: principle of least privilege, auditing.
  • Monitoring & Incident Response: SIEM, anomaly detection, alerting.
  • Secure SDLC: threat modeling, STRIDE, abuse cases, security reviews.
  • Security Testing: static analysis (SAST), dynamic analysis (DAST), penetration testing.
  • Zero Trust Principles: network segmentation, identity-aware access.

Advanced / Modern Web Concerns

  • AI/ML API Security: prompt injection, model data leaks.
  • GraphQL-specific Risks: introspection, batching attacks.
  • Multi-Tenancy & Data Isolation: proper tenant isolation in SaaS apps, preventing IDORs (Insecure Direct Object Reference)
  • Serverless Security: least privilege IAM, cold-start secrets, event injection.
  • SSRF & Cloud Metadata Protection.
  • Supply Chain Security: typosquatting, malicious packages.
  • WebSockets Security: auth, rate limiting, input validation.

How to Delete All Local Git Branches in One Command

First, checkout to main (or any other branch you want to clear from upstream branches).

Now, let’s build the command, step by step.

  1. Check which branches were merged to the current branch:
Shell
git branch --merged
  1. Filter out current branch from the output – it is marked by an asterisk (*):
Shell
git branch --merged | grep -v \*
  1. Turn the columnar output into a space-separated string:
Shell
git branch --merged | grep -v \* | xargs
  1. Feed these arguments to the deletion command (passed in the second argument of xargs):
Shell
git branch --merged | grep -v \* | xargs git branch -D

How to Recall Your Google Meets Fast

I have to confess. I am a sinner — I constantly forget to log my time spent on tasks! I postpone this demanding chore for a week, until our PM comes bashing my door (and I work remotely!): “Please log your time, we need to create reports!” And here lies the problem: usually, I can hardly remember even what happened yesterday, let alone the whole week. I believe I am not alone here.

Alright, so now I need to log my work time for the week. I can track code contributions by commit dates, but how do I log meeting times? A common way to do this is to sweep through emails, Slack messages and meeting notes, but it is chaotic and time-consuming. If you use Google Meet, there is a much more straightforward way — Google Takeout!

Google Takeout is a service that allows you to download all data Google keeps about your account. This is a very interesting yet terrifying resource: you’ll find data from over 60 different services, some of which may keep gigabytes of your data! But for our current goal, we only need Google Meet data.

What to do

First, visit https://takeout.google.com/ from a work account. Deselect all checkboxes, then find and mark Google Meet. Scroll to the bottom of the page, and click primary-colored buttons a couple of times. Google will prepare data export and will send a link to your email. Use it to download a zip archive with data and unpack it.

When you get to Google Takeout page, deselect all checkboxes and then find and mark Google Meet.
Click “Next step”, then “Create export” — Google will send a report to your account email in a minute.

The downloaded folder has a nested structure of ./Takeout/Google Meet/ConferenceHistory with two .csv files inside. We will need only conference_history_records.csv. It is a large csv file with about 20 columns, holding information about all meets for your account. Let’s tidy it up with some command line magic to get a convenient output:

Shell
awk -F ',' '{print $5 "\t" $10 "\t" $12}' "~/Downloads/Takeout/Google Meet/ConferenceHistory/conference_history_records.csv" | head -n 20 | column -ts $'\t'

This command parses the csv and outputs only important data in a columnar view: meeting code (the same one used in Google Meet Links), date and time of the meet and its duration.

Meeting Code  Start Time               Duration
rst-uvwx-yza  2025-08-17 14:14:14 UTC  1:07:18
fgh-ijkl-mno  2025-08-16 06:36:12 UTC  0:23:57
vwx-yzab-cde  2025-08-15 17:20:33 UTC  0:41:03
klm-nopq-rst  2025-08-14 09:09:09 UTC  1:15:42
yza-bcde-fgh  2025-08-13 20:48:06 UTC  0:55:56
hij-klmn-opq  2025-08-12 07:02:08 UTC  0:17:15
opq-rstu-vwx  2025-08-11 15:33:54 UTC  0:34:29
tuv-wxyz-abc  2025-08-10 05:44:21 UTC  1:49:37
def-ghij-klm  2025-08-09 19:59:59 UTC  0:26:04
uvw-xyza-bcd  2025-08-08 11:11:11 UTC  0:09:48

Now it is much easier to recall which meetings they were and how long they lasted. Unfortunately, this file does not provide meeting names — but now retrieving them is easy: just copy-paste meeting code into your gmail search box, and you will find your invitation email with all the details.

This way I manage to save myself some 15 to 20 minutes each week. I hope this trick helps you, too.

Enforce Any Code Style Constraint with ESLint

When managing big software projects, it is important to configure code rules for loads of scenarios. Usually, you start with basics, like prohibiting unused variables, requiring super() calls in subclass constructors, or catching duplicate conditions in if-else blocks.

In JavaScript / TypeScript projects that is handled by standard ESLint plugins: @eslint/js, typescript-eslint, eslint-plugin-react, etc. They are more or less easy to configure (ignoring the new flat config which adds the fun of guessing which plugins support it and which don’t yet), and this is where most tech leads stop.

However, the bigger the project, the more dependencies and opinionated patterns of doing something it accumulates. Large packages may have separate ESLint plugins maintained by independent contributors, but sometimes you’ll want to enforce a rule that doesn’t exist in any plugin. This becomes very important when you expect many people to work on the project, or if you want to use AI agents to write acceptable production code without thorough manual review.

The good news: ESLint lets you create almost any rule you can imagine! You don’t need to know specifics of ESLint scripting, since ChatGPT successfully manages to write 95% of the logic, and the remaining 5% would be easy finish when you see selector structure and regex patterns.

Here, I want to share a specific example. On my current frontend project we use Typescript, React, and Next.js with zustand for client-side state storage. To persist state after a page reload, I added the persist plugin that writes and reads data from browser’s localStorage. The problem is, Next.js renders client-side components twice: first time on server, then in browser, and both renders must match. However, the server doesn’t have access to client data, and the store state differs between environments, unless it was not used before.

The fix is to run rendering with an empty store, and then reading the state specifically on client side. In this case, both server and browser use the same empty state during the first render. This is achieved by using a custom hook, useStore, which returns an empty initial state and loads the actual state on client inside a useEffect:

TypeScript
export function useStore<T, F>(
  store: (callback: (state: T) => unknown) => unknown,
  callback: (state: T) => F,
) {
  const result = store(callback) as F;
  const [data, setData] = useState<F | undefined>(undefined);

  useEffect(() => {
    setData(result);
  }, [result]);

  return data;
}

Now state can be retrieved like this:

TypeScript
import {uiStore} from '@/store/ui';
import {useStore} from '@/hooks/useStore';

const visiblePanels = useStore(uiStore, (state) => state.dashboard.visiblePanels); ✅ correct
const visiblePanels = uiStore((state) => state.dashboard.visiblePanels); // ❌ wrong!

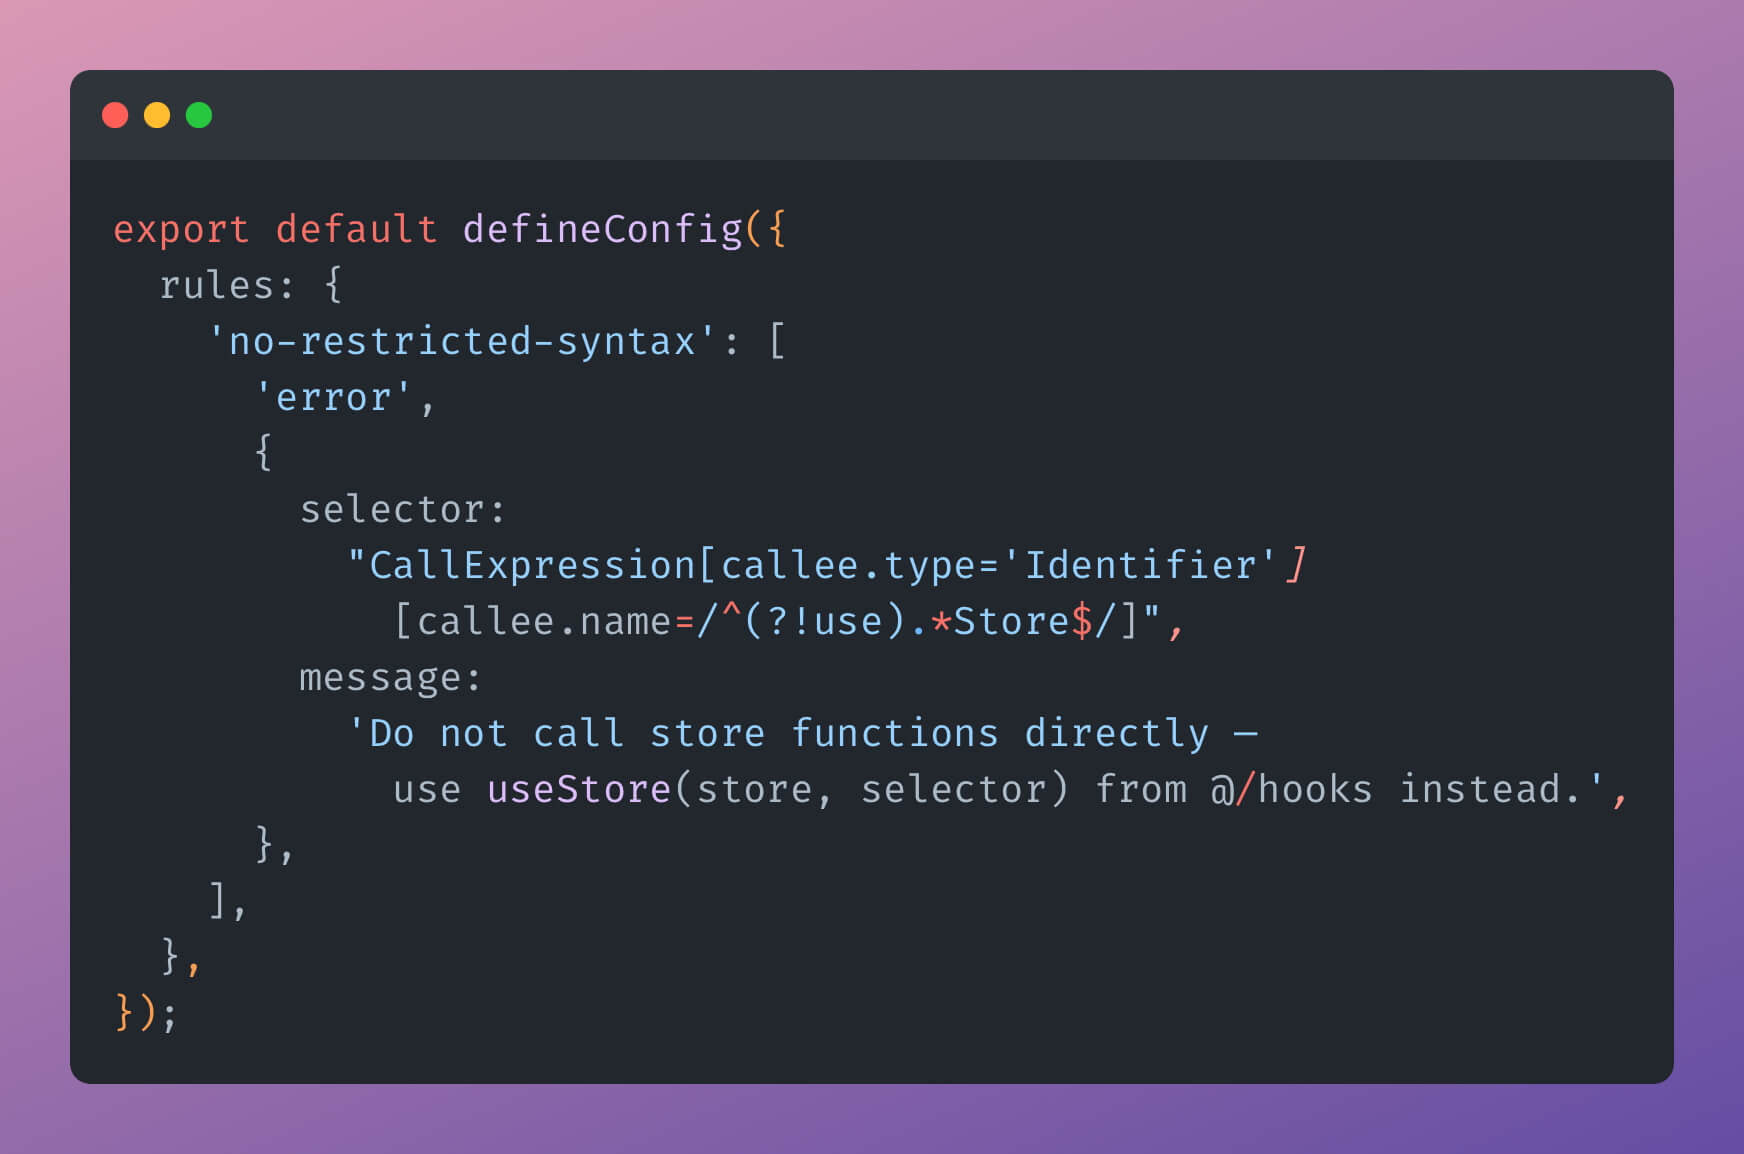
A problem is, nothing in this setup stops someone from using the wrong pattern. Moreover, the wrong way is the default in normal conditions, so any new developer or AI model are likely to use it. Here is where ESLint magic comes useful:

JavaScript
// eslint.config.mjs

export default defineConfig([
  // ...necessary plugins here...
  {
    rules: {
      'no-restricted-syntax': [
        'error',
        {
          selector: "CallExpression[callee.type='Identifier'][callee.name=/^(?!use).*Store$/]",
          message: 'Do not call store functions directly — use useStore(store, selector) from @/hooks instead.',
        },
      ],
    },
  },
]);

This way we tell ESLint to watch for any invocation of functions whose name ends with a Store, except for useStore — our custom hook. Direct usage will be flagged, so the new devs or models will be able to correct themselves. Surely, someone could write a store with a name different from useSomethingStore, but this naming format is common and default by docs, so we stay on a safe ground here.

With this approach, you can enforce any code style, variable usage rule, import restriction, or architectural constraint. Add them, use them, and may your code be impossible to write in a wrong way.

Shell Configs for Better Command History Search

In continuation of my previous post, How to View Past Terminal Commands: from Simple to Robust, I want to share shell config settings that help finding commands faster, while also looking for them much more further in the past.

Increase History Limits

First, HISTSIZE and HISTFILESIZE. These settings control how many past commands are stored in session memory and in the history file, respectively. Their defaults are 1000 commands for HISTSIZE and 2000 commands for HISTFILESIZE.

This is way too low for modern computers. If an average command length is 20 characters, then history settings limit us to only 40 KB in RAM and 80 KB on disk. Also there is no real benefit to storing fewer commands in memory: if a history entry exists, you should be able to access it using history command without additional tricks.

Let’s increase the limits:

Shell
# bash
HISTSIZE=50000
HISTFILESIZE=50000

# zsh
HISTSIZE=50000
SAVEHIST=50000

Remove Duplicates in Search

Now, let’s compress history entries. When I lookup commands using reverse search (Ctrl+R), I do not want to see duplicates like docker build. Let’s keep only the most recent copy of each command:

Shell
# bash
HISTCONTROL=ignoredups:erasedups

# zsh
setopt HIST_IGNORE_ALL_DUPS

Ignore Noise in History

When I use command search using arrow keys, I want to get quicker to useful commands, rather than wasting time and attention to common simple commands, such as ls or cd. Let’s prevent them from being saved at all:

Shell
# bash
HISTIGNORE="ls:cd:cd -:pwd:exit:clear"

# zsh
HIST_SKIP_PATTERN='^(cd|ls|pwd|clear|exit)(\s|$)'

Sync History Across Sessions

By default, history is saved only when a session closes. Let’s fix it: the terminal should append new commands and make them accessible in all open sessions immediately:

Shell
# bash
PROMPT_COMMAND='history -a; history -n'
shopt -s histappend

# zsh
setopt SHARE_HISTORY
setopt APPEND_HISTORY
setopt INC_APPEND_HISTORY

Final Setup

Now we are good! Below are full settings for both bash and zsh. Do not forget to run source ~/.bashrc or source ~/.zshrc after you make the changes.

Shell
# bash
HISTSIZE=50000
HISTFILESIZE=50000

HISTCONTROL=ignoredups:erasedups
HISTIGNORE="ls:cd:cd -:pwd:exit:clear"

PROMPT_COMMAND='history -a; history -n; $PROMPT_COMMAND'
shopt -s histappend
Shell
# zsh
HISTSIZE=50000
SAVEHIST=50000

setopt HIST_IGNORE_ALL_DUPS
HIST_SKIP_PATTERN='^(cd|ls|pwd|clear|exit)(\s|$)'

setopt APPEND_HISTORY
setopt SHARE_HISTORY
setopt INC_APPEND_HISTORY

Happy command searching!

P.S. Want Full Command Logging?

If you want to keep full command history, you are not constrained to inefficient search. You still can apply all the changes above, but additionally configure the shell to store full log in a separate file:

Shell
# bash
export LOGFILE=~/.full_bash_history.log
PROMPT_COMMAND='
  history -a
  history -n
  this_command=$(history 1 | sed "s/^[ ]*[0-9]*[ ]*//")
  echo "$(date "+%Y-%m-%d %H:%M:%S")  $this_command" >> "$LOGFILE"
'

# zsh
function preexec() {
  local LOGFILE=~/.full_zsh_history.log
  echo "$(date '+%Y-%m-%d %H:%M:%S')  $1" >> "$LOGFILE"
}

How to View Past Terminal Commands — from Simple to Robust

Suppose you want to re-run some shell command you used ten days ago. It is a complex one; you do not remember exact flags and argument values, and it would take a long time to recall an exact text. What can you do?

1. The upwards arrow

Majority of devs working with command line knows it. Press “up” to see a previous command, press “down” for a next command, press “Ctrl+C” to drop whatever is in the prompt and start fresh.

This approach works, but gets very tedious when you need to find a command you used last week or last month. Once more than ten or twenty commands have passed, scrolling through them becomes tedious.

2. Terminal history file

All the commands you enter into a terminal get stored in .bash_history file (or .zsh_history if you are on Mac) up to a certain limit. Thus, you can run:

Shell
cat ~/.bash_history # output all into the terminal
less ~/.bash_history # or use any text viewer
tail -n 20 ~/.bash_history # or observe only the most recent n lines
cat ~/.bash_history | grep whatever # to search for specific patterns

This method gives you full access to your history file, and lets you search more flexibly.

3. history command

Almost the same as using the history file directly: you get a list commands, but now it is numbered.

Shell
history -20 # show the last 20 commands
history -500 | grep ssh # search for a specific patter in a command
!780 # execute command with order number 780

But there is one important difference from direct usage of .bash_history:

  • history command uses the last HISTSIZE history entries (default 1000)
  • .bash_history file uses the last HISTFILESIZE entries (default 2000)
    So, if your command was run a really long time ago, history may not find it, but direct inspection of .bash_history can do.

4. fc -l command

This command behaves very similar to history, with an additional ability to display ranges of command numbers::

Shell
fc -l -20 # show the last 20 commands
fc -l 100 150 # show commands 100 to 150

5. Reverse-i-search

This is the most powerful approach. Press “Ctrl+R” to enter reverse incremental search mode. Initially you get no output; start writing any part of a command you remember, e. g. ssh or input.json or -n 10 — and you will see the first full command entry with that match!

From there, you can:

  • Press “Enter” to execute the command immediately
  • Use left/right arrow keys to move within a command to edit it, then press “Enter” to execute
  • Press “Ctrl+R” again to go to the next, older match
  • Press “Ctrl+S” to go to the previous, newer match (see comment below)
  • Press up-down arrows to view to nearby entries in history around the match
  • Press “Ctrl+C” or “Ctrl+G” to exit the search

On many systems “Ctrl+S” shortcut will not work, as it is prioritized to pause terminal output (press “Ctrl+Q” to resume). To make it work for reverse-i-search, add stty -ixon to your shell config. It will disable “Ctrl+S” / “Ctrl+Q” shortcuts for terminal flow control:

Shell
echo "stty -ixon" >> ~/.bashrc
source ~/.bashrc

Happy command line manipulation!

💡 This post has a second part: Shell Configs for Better Command History Search

The Very Roots of Object-Oriented Programming

An image below is the first historical mention of something resembling objects we use today in OOP.

An ancestor of all modern objects — plex. Rectangles represent data in memory. Yellow ones are pointers to other objects, green rectangles hold actual values, red rectangles are pointers to functions, and blue rectangles are flags that control program execution flow.

The author is Douglas T. Ross from MIT, who published this concept in a paper A Generalized Technique for Symbol Manipulation and Numerical Calculation in 1960! He called it a plex, a shorter form of plexus, meaning “an interwoven combination of parts in a structure; a network”.

This solution was intended to solve problems for which commonly used linked list or tree structures were not sufficient enough. Each plex could hold both data and an arbitrary number of pointers, allowing it to represent complex object relationships — essentially, a network of interconnected elements. Pointers do not only point to other plexi, they could also point to functions. And, as these are not actual functions but pointers (which can potentially be changed during runtime), this means an invention of virtual functions as well. A truly fascinating stuff!

I’ve learned this bit from a great talk of Casey Muratori at the Better Software conference in which he digs into the history of OOP in C++. I highly recommend watching it in full.

Earlier Ctrl + ↓